Before starting to work with neoStampa, you will have to select the printers you wish to use with the program, set the type of connection, and other advanced parameters.
▶️ Watch the tutorial

Driver installation
- Clean installations show a missing driver warning. Click on 'OK' to open the driver installation window. The Printer configuration window opens where you can search and add your printer driver.

- If you start from the updated installation, you can access the Printer Configuration by clicking on File | Configure Printer… from the unfolded list or access by clicking on the printer icon at the top of the window.
Step-by-Step
1. The 'Add...' and 'Remove' buttons allow you to introduce the printers you require in the list of installed printers.

2. The 'Add...' button opens the drivers' list, where you choose your printer brand and model. If your specific printer model is not on the list, please contact Tech Support and provide the printer information as well as your license number.

3. You can configure the type of connection used for each printer. To do this, select the printer from the list and then select the required type of connection in the Connectivity section.
- You can change the connection values (IP address, etc.) through the Options... button. To do this, select the printer from the list and then select the required type of connection in the Connectivity section.
- The Test… button on the lower part of the window checks the connection.
- If you want to send our jobs directly to the Print Server from neoStampa, enable the 'Use local Print Server' option.

4. If various printers are installed, only one of them can be the default printer. This is the one that will always be used when the program starts and when a new document is opened. To change the default printer, place the mouse on it, right-click, and select Establish as default from the menu.

Connectivity
Connecting a computer to a printer may seem a very simple thing to do, but in fact, there are many aspects to take into consideration, some of which are anything less than obvious. There are always alternative connecting methods that can be done if regular procedures fail. The most common problems in badly implemented connections are the following:
- The slowness in sending data makes the printer "timed-out" while data is being sent, and so it stops.
- Data interruption problems cause the printer to stop printing or make it behave oddly.
Local Print Server Connection
This option is to be selected when ripping and printing jobs with the Print Server queue component of neoStampa. Once the option is selected you can start the Print Server when clicking on the button 'Start..'. Later, when preparing print jobs in neoStampa and sending it to print, it will send the job to the Print Server queue.
Remote Print Server Connection (PRNSVR)
This will configure the driver to print with a remote Print Server. Add your printer driver and in connection select the remote Printer Server with connection type PRNSVR: (PrintServer). Click on Option and select the IP to your remote Print Server.
Parallel Connector
Also known as the printer port (LPTX). This type of system only needs a parallel cable, and although it is simple to use, it can be slow. Many modern circuit boards support high-speed parallel ports that comply with the IEEE1284 standard. However, to be able to use these ports, any system has two requirements. The port must be ECP configured and use a 32-bit operating system (WNT, 2000, XP), and the parallel cable must also comply with this standard. If the system complies with these requirements, then you should enable this connection by configuring the parallel port in the program. From the printer's Configuration, chose the Lpt1 (parallel port) connection, and with the Options button, use extended ECP mode.
USB Connection
Several Parallel to USB converters exist, but in this case, they are installed in the generic printer system, using the drivers of the converter. Configure the program connection as SPOOLER, and select the printer driver that has been configured for using the converter. After selecting USB (Universal Serial Bus) on the Connection drop menu, a new Settings menu will open. By clicking on Detect...>> we can see the USB devices connected to the computer and select the right one. Some printers connected by USB require the installation of additional drivers provided by the vendors. Please consult the makers' website or Inedit Tech Support for the proper drivers.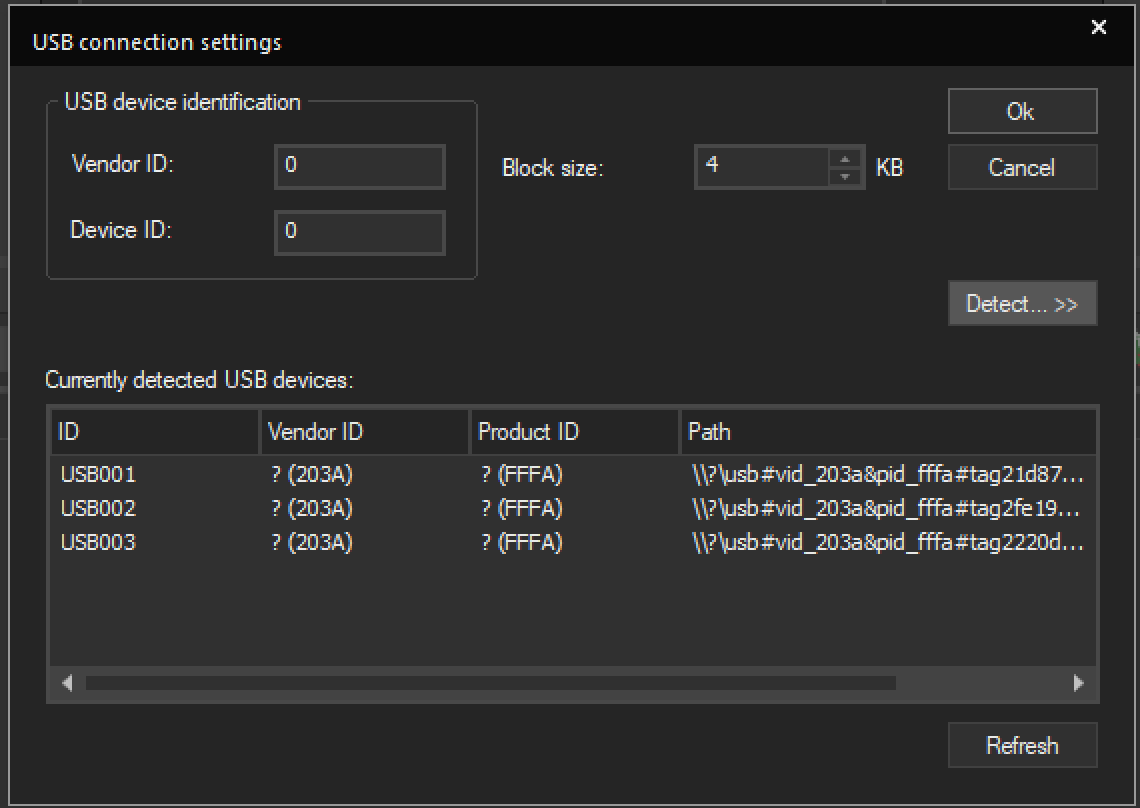
Network Connection
This is the fastest and most secure connection for the transmission of data. Some printers already support direct network connection. Also available in the market are Parallel Network converters, which are suitable. An important consideration is that such a converter is of good quality and conforms to the IEE1284 parallel standards. If it does not, communication with the printer will be slow. In the latter cases, you will need to configure the program connection as TCP/IP and configure the IP addresses correctly.We just have to input the IP Address and click on Test... if the connection is OK. Please be aware that, since the system has to support the transmission of a lot of data, some printers require a high-capacity network compliant with Gigabit Ethernet to work properly.

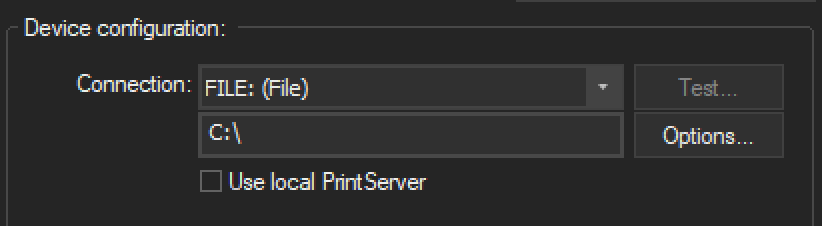
FILE connection
This is a standard connection. Click on Options and select the folder where we leave the processed files (usually a shared folder on the network) and the printer will load them automatically.
NULL Connection
Some printer makers use their own controller programs between neoStampa and the printer. In these cases, we can use the NULL Connection and the information will automatically be sent to the controller.
Other Connections
Since the program is able to use the drivers of printers installed on Windows (SPOOLER), it is possible to connect them to any printer, with any kind of connection supported by Windows, for example, FireWire.
Related articles:
1. The 'Add...' and 'Remove' buttons allow you to introduce the printers you require in the list of installed printers.
2. The 'Add...' button opens the drivers' list, where you choose your printer brand and model. If your specific printer model is not on the list, please contact Tech Support and provide the printer information as well as your license number.
3. You can configure the type of connection used for each printer. To do this, select the printer from the list and then select the required type of connection in the Connectivity section.
- You can change the connection values (IP address, etc.) through the Options... button. To do this, select the printer from the list and then select the required type of connection in the Connectivity section.
- The Test… button on the lower part of the window checks the connection.
- If you want to send our jobs directly to the Print Server from neoStampa, enable the 'Use local Print Server' option.
4. If various printers are installed, only one of them can be the default printer. This is the one that will always be used when the program starts and when a new document is opened. To change the default printer, place the mouse on it, right-click, and select Establish as default from the menu.
Connectivity
Connecting a computer to a printer may seem a very simple thing to do, but in fact, there are many aspects to take into consideration, some of which are anything less than obvious. There are always alternative connecting methods that can be done if regular procedures fail. The most common problems in badly implemented connections are the following:
- The slowness in sending data makes the printer "timed-out" while data is being sent, and so it stops.
- Data interruption problems cause the printer to stop printing or make it behave oddly.
Local Print Server Connection
This option is to be selected when ripping and printing jobs with the Print Server queue component of neoStampa. Once the option is selected you can start the Print Server when clicking on the button 'Start..'. Later, when preparing print jobs in neoStampa and sending it to print, it will send the job to the Print Server queue.
Remote Print Server Connection (PRNSVR)
Parallel Connector
USB Connection
Network Connection
We just have to input the IP Address and click on Test... if the connection is OK. Please be aware that, since the system has to support the transmission of a lot of data, some printers require a high-capacity network compliant with Gigabit Ethernet to work properly.
FILE connection
This is a standard connection. Click on Options and select the folder where we leave the processed files (usually a shared folder on the network) and the printer will load them automatically.
NULL Connection
Some printer makers use their own controller programs between neoStampa and the printer. In these cases, we can use the NULL Connection and the information will automatically be sent to the controller.
Other Connections